Setting up a Pardot Integration
With a Pardot Integration you export your emails directly to Pardot with the click of a button.
Introduction:
MashrMail delivers the most value when it integrates seamlessly with your email sending platform. By setting up a Pardot integration you will be able to easily export your finalised emails directly to Pardot with a click of a button.
Set up a Salesforce User
Firstly you will need to set up a new Salesforce User. We recommend having a separate Salesforce Identity user for connecting with MashrMail to ensure you can manage this account separately without affecting your actual users.
In Salesforce Setup, search for Users and select New User
Enter the new user's details and select ‘Identity’ as the user licence type.
When you save the new user you will receive a notification to activate the account.
Once you have activated the account and set the password you can proceed with the next step.
Generate a Security Token
Security tokens in Pardot are generated on per-user bases and used to for API connectors. Once logged in to Salesforce with your separate Identity user follow the steps below to generate a new unique Token.
Select your user at the top right, and then go to My Settings.
Navigate to ‘Reset My Security Token’ in the side menu or search for ‘Token’ to find it easily.
You should shortly receive an Email with your new Security Token. Save this somewhere safe as you will need it in a later step.
Setup Pardot User
Next, you will need to set up a Pardot user and link this with the Salesforce user you created previously.
Launch Pardot and go to Settings, Users and Add User
Enter the name and email address you entered for the Salesforce User
From the ‘CRM Username’ dropdown, select the username you for the Salesforce User. You may need to refresh the user list by selecting the small refresh icon on the right of the menu.
From the ‘Role' menu, select 'Marketer’. We recommend using this role to ensure the integration only has the access required for the connector.
Select the option to Disable all emails that will be sent to this user.
Select ‘Create User’
Enable Salesforce single sign-on link to complete setting up the Pardot user.
Create Salesforce Connected App
Salesforce manages its API connections by setting up a connected app for each individual connection so you will need to follow the steps below to create this so that you have the details required to finish everything off.
In Salesforce Setup, go to App Manager in the sidebar, or search for ‘App Manager’
Select ‘New Connected App’
Enter some basic information for your connect app. We recommend calling the app 'MashrMail'.
Check ‘Enable OAuth Settings’ in the next section
In the ‘Selected OAuth Scopes’ options choose ‘Access Pardot services OAuth Scope’
Select ‘Save’, and ‘Continue’ if prompted.
Once saved you will be shown the App details page. Here you need to copy two important pieces of information.
Consumer Key
Consumer Secret
Find your Business Unit
The final piece of the puzzle is your Business Unit which can easily be found in your Salesforce settings.
Open Salesforce Settings
Search the sidebar for ‘Pardot Setup Home’
Select ‘Assign Admins’
On the following screen, you will see the field for Business Unit ID next to your users. Copy this Business Unit, you will need this in your final step below.
Exit out of the admin screen to finish.
Setting up the integration in MashrMail
Once you have worked through the above steps you will have all the details required to set up your new Pardot Integration with MashrMail.
Open MashrMail and login to your account
Select ‘Settings’ from the man navigation
Select ‘Integrations’ from the sub-navigation.
Select Pardot from the list of available ESP/MAPs. Once selected you will be prompted to enter the following details
Email: This is the email address of the specific Identity user you set up for the connection.
Password: This is a combination of the password for the connection user + the unique security token generated in step 2. E.g. If your password is ‘Welcome1’ and the Token is ‘123456789’ then the value for this field is ‘Welcome1123456789’.
Consumer Key: This is the Connected app consumer key you created above.
Consumer Secret: This is the Connected app consumer key you created above.
Business Unit: This is the Business Unit you copied in the previous step.
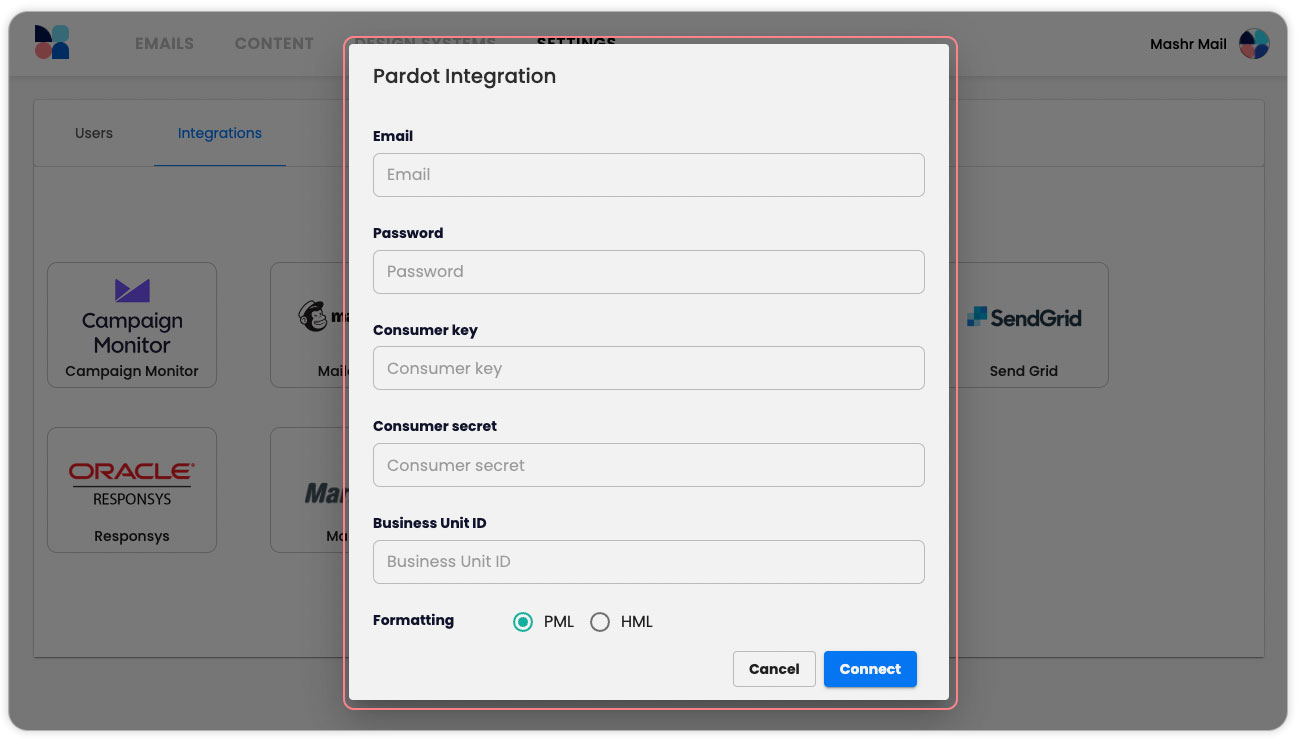
Select ‘Connect’ and you’re all finished! You can now export emails directly from the email builder using the export button.